Tutorial: Spray Paint
Spray paint is fast and easy to use, has lots of color options, and costs only about $5 $8 (2023 prices, can you believe it?) per can.

My current collection.
I may or may not be a spray paint hoarder.
Hello, Dear Readers!
Spray paint is one of my favorite ways to bring old objects new life! It gives a flawless finish with no brush strokes (obviously!) and it’s easy, fun, and fast.
My favorite brand: Rustoleum
Great coverage, lots of colors, formulas to cover almost any material, doesn’t clog, easy to use.
Use spray paint when:
You’re in a hurry. Dries to the touch and can recoat in minutes
You want a flawless finish, especially for metallics and chalkboards
You don't want to prime; spray paint is paint and primer in one. Plastic, metal, glass and other shiny materials require the added step (and expense and time) of primers specific to those materials when not using spray paint.
The project has a lot of details that would make you crazy trying to get to with a brush
Difficulty Level:
Easy
Materials:
Spray Paint
Mask
Eye Protection
Dropcloth or Spray Tent
The project is relatively small. Things like flower pots, candle holders, hatboxes, drawer pulls, and knick knacks are perfect candidates. Small furniture works well but a dresser wouldn’t be efficient.
It’s not windy and it’s over 50 degrees outside (unless you have a spray tent inside, then go for it!)
Let’s do this!!

The label has all the info you need!
Choose your paint. Make sure it’s a “paint and primer in one.”
The labels will tell you everything you need to know, as long as you have answers to the following:
What is your project made of?
wood, plastic, metal, laminate, ceramic, space debris
How shiny do you want it to be?
flat/matte=no shine at all (like a chalkboard)
satin=a little shine (like an eggshell)
gloss=very shiny (like put on your sunglasses!)
What color?
The color of the top of the can matches the color inside. Genius, right?
Will your project live inside or outside?
Outdoor things need more protection so spray paints for outdoor projects are formulated for weather—and in Wisconsin, we definitely have a variety of weather!
How much to buy:
It depends. In general one can of spray paint will cover between 7 and 8 square feet. Plan on at least two coats for darker colors, more for lighter colors (especially if going from dark to light). For my 4 foot by 2 foot chalk board (see it in the gallery below), I used one and a half(ish) cans because it’s large and I was covering a pattern so it needed three coats. I usually buy a little extra to be safe.
There is no such thing as leftover paint. It’s on stand-by, faithfully awaiting your next project.
Prepare:
If painting outside: protect the area with a drop cloth.
If painting inside (garage, not living room): make sure you have good ventilation, protect the floor with a drop cloth and walls with curtains, or use a spray tent (they’re available on Amazon in lots of sizes, this is the one I use).
Wear a respirator or mask and eye protection. Also wear clothing that it’s ok to get a little paint on. Tiny, tiny dots of paint land EVERYWHERE.
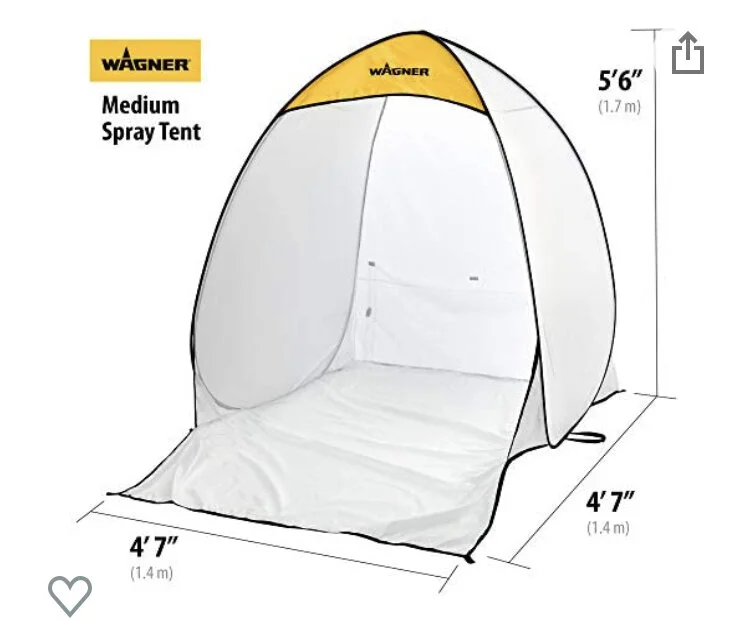
It folds up into a neat little pouch!
Step One: Clean your project with soap and water, then rinse and let it dry.
Especially if it’s thrifted. Other people’s dirt is all over that thing.
Sand your project only if you need to smooth out the surface or to remove flaking paint/rust/whatever. Wipe it down with a microfiber cloth after sanding to get rid of dust.
Click here for my post about sandpaper and when to sand!
Step Two: Paint! Hold the can 6 to 8 inches from the surface and use a sweeping motion to do a light coat. Hold the can a little to the side of your project and start spraying, then sweep over the project side to side. Don't start spraying with the can right in front of your project to avoid a big blob of paint at that starting point. The first coat always looks kind of bad, don’t worry! Multiple light coats ensure you don’t get drips and that it dries evenly and quickly. You DO NOT need to sand in between coats of spray paint.
Do not be a rebel and try to spray a thicker coat. It will drip and then you have to live with it or sand it off and start over. Ain’t nobody got time for that.
Follow the directions on the can for drying and recoating times; usually it dries to the touch within a few minutes and you can recoat. Wipe off the nozzle when you’re done to prevent paint drying there and clogging it up.
Possible Step Three: Topcoat. A topcoat (sometimes called a sealer) is a product you brush, wipe, or spray on your project once it’s painted or stained to protect it and/or to add some degree of sheen (sheen = shiny-ness, see above).
Does your project need a topcoat?
YES:
Furniture
Heavy-use items (trays, drawer pulls—although I’ve broken this rule on drawer pulls and it’s been ok.)
Items that come in contact with water
*Spray paint is oil-based. If using a water-based topcoat you need to let it dry for 72 hours. Oil and water don’t mix.
You’re almost there! CLICK HERE for my Top Five Topcoats post!
NO:
Decorative objects
(frames, knick knacks)
Gentle-use items (candle holders)
Chalkboard paint
Your project is done! Congrats!
And now, for your viewing pleasure: a gallery of objects I have spray painted and the paints I used to do it. Hover over each to see more info. Enjoy!


Have you read my topcoat post??
Pop Quiz:
Which of the above need a topcoat?
If you answered shelves (a heavy-use item) and table legs (a gentle-use item, but it’s furniture)…you’re right! I used the Rustoleum spray topcoat on the shelves and wax on the table legs.
Chalkboards and knick knacks don’t need to be sealed.
I hope this was helpful, my friends!
Please reach out to me if you have questions, I’ll do my best to help!
